Instances
This pages goes over instances in Openstack, what are they, how are they created, how to modify an instance, etc. The instance page can be found in the Compute sub-section under Project on the left hand side.
Creating instances
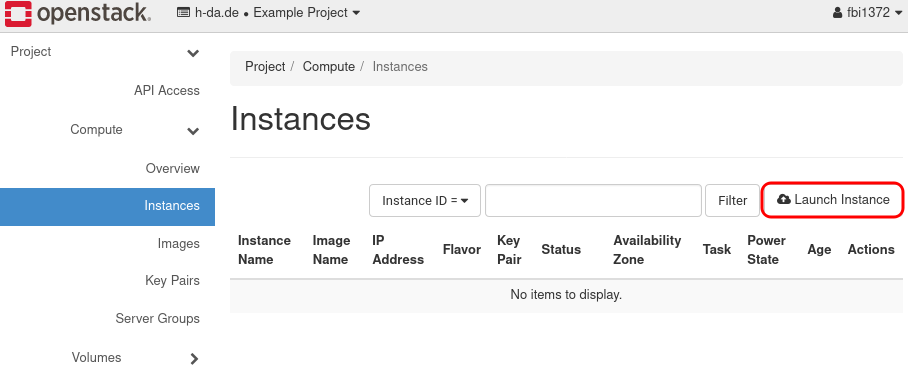
To create an instance click on the Launch Instance button on the right. You will now be presented with an dialog to specify the details of your instance.
Configuring the instance
The Details page of the configuration dialog is used mostly only to name your instance as this
is the only required information you mus provide here. You may also optionally provide a
description or increase the count if you wish to deploy multiple identical instances.

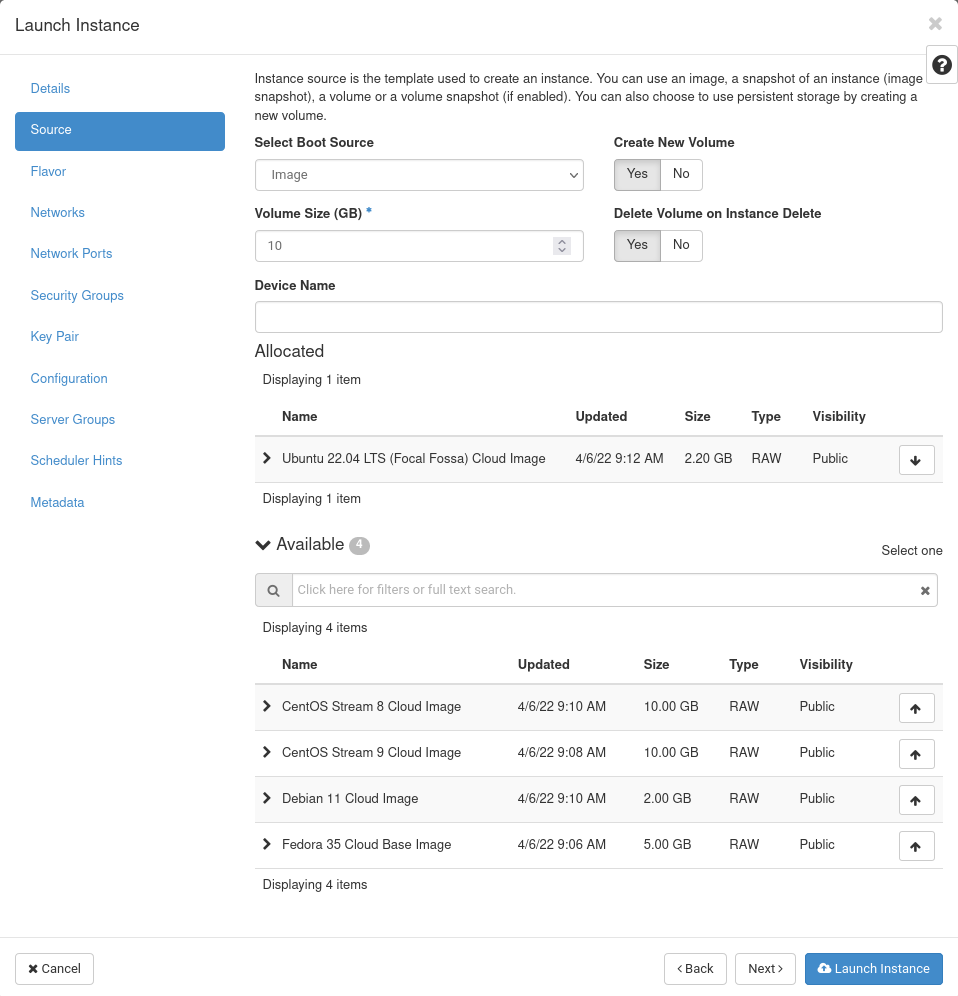
The Source page is where you select the image you want to use for your instance. we provide a
selection of images, but it is also possible to upload your own image, if the
selection does not suit your needs. Here you also specify the boot volume's size.
Regarding volume size
As alluded to in the documentation of the Overview Page, we provide
different storage classes which have different quotas. The fast
storage class, which is the default for boot volumes, has a way smaller quota than the
slow storage class. Therefore, you may see an error message like this:
VolumeSizeExceedsAvailableQuota: Requested volume or snapshot exceeds allowed gigabytes_fast
quota. Requested 120G, quota is 30G and 0G has been consumed.
If you require more storage for an instance refer to the volume management section later in this documentation.
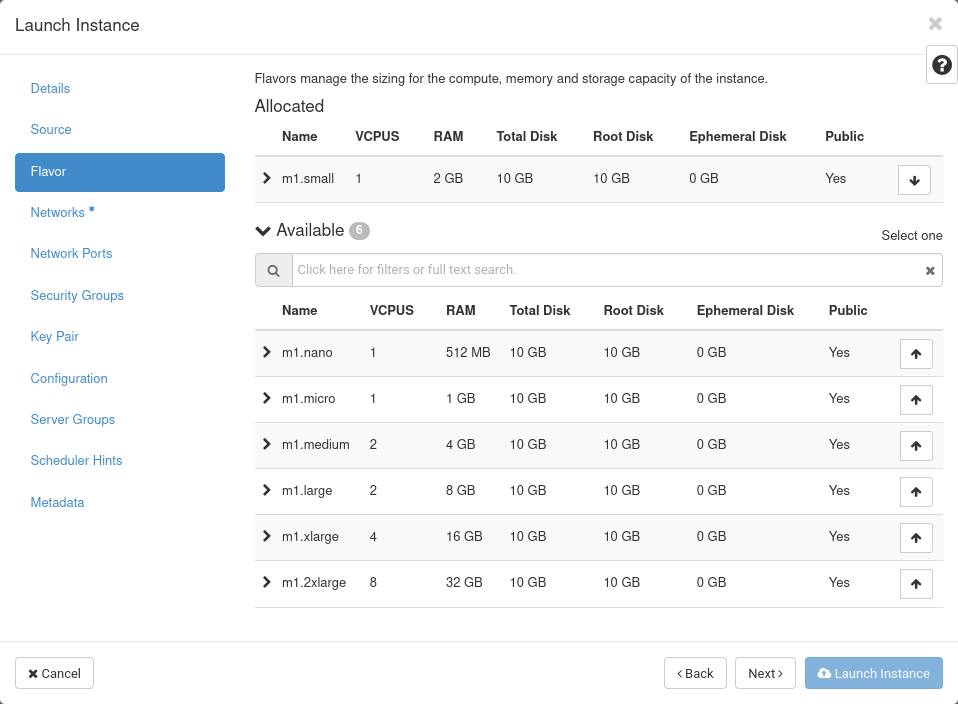
The Flavor page is where you select the compute resources, e.g. VCPUs, RAM for your instance.
These are pre-defined in so-called flavors. We go over flavors in more detail later in this documentation.
Note
You will also see flavors with an exclamation mark next to it. These are exceeding your current quota and can therefore not be used for instance creation.
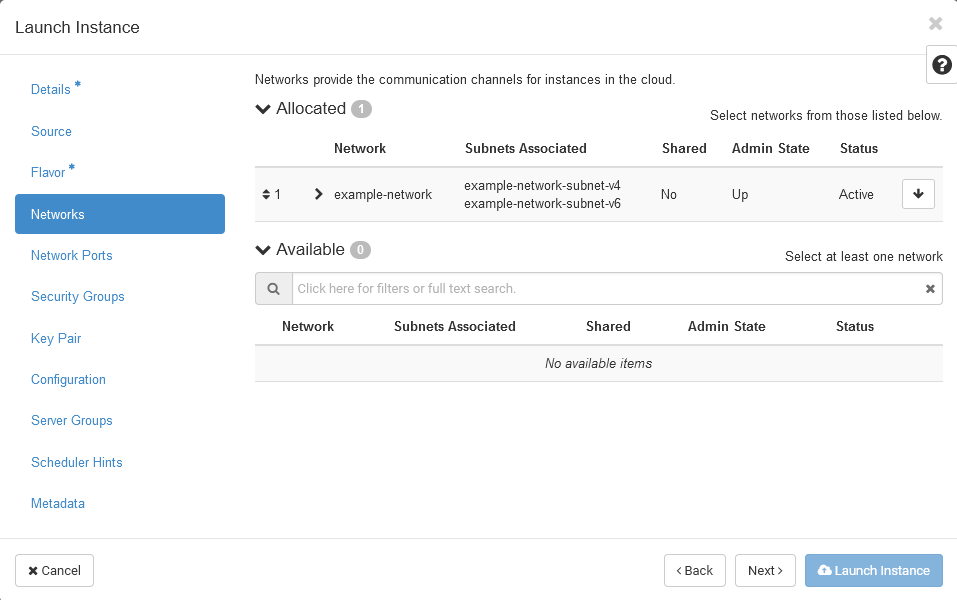
If you do not have created any other networks yet, you will find a network pre-selected on the
Networks page. Here you define the networks your instance will be part of. Each instance will
able to access the internet when assigned the project network (<project-name>-network) by
default. We will go into more detail on how to restrict access of instances later.
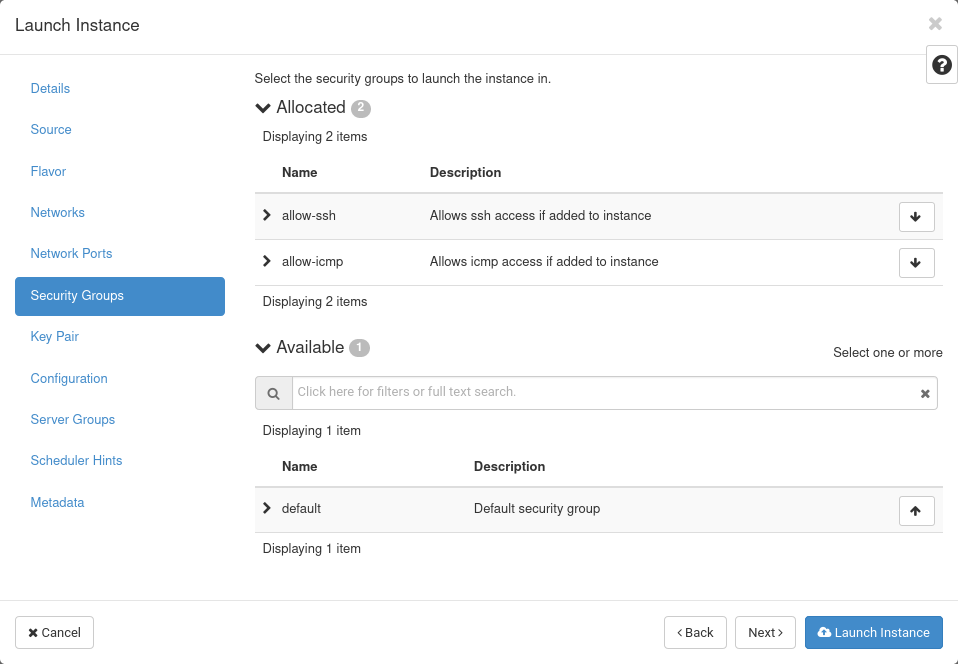
On this page you can attach so-called Security Groups to your instance. Security Groups are
collections of rules to modify access to your instance. These will be used when port-forwarding
is necessary, take accessing your instance via ssh as an example for this.
You will also find some pre-defined security groups here. We strongly advice you to add the
allow-ssh and allow-icmp security groups to your instance, as you will otherwise not be
able to access your instance or verify reachability using ping.
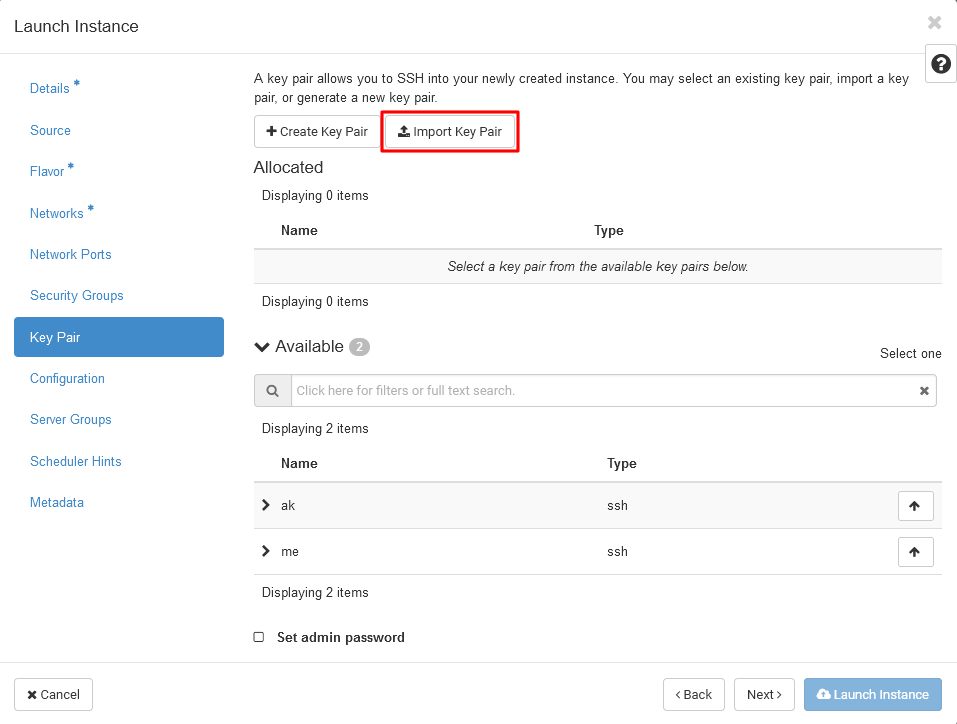
The Keypair page ist used to define SSH Keys that should be added to the instance's
authorized_keys file. If you created keypair previously it will be automatically selected.
If you don't yet have a keypair in OpenStack you can choose to Create a new one or import an
existing one from your PC.
Instance Access
If you do not add an SSH key to your instance, you will not be able to access your instance after it has been launched. Therefore, be sure to add an SSH key here. Otherwise, you will need to rescue your instance or re-create it. SSH password access is disabled by default!
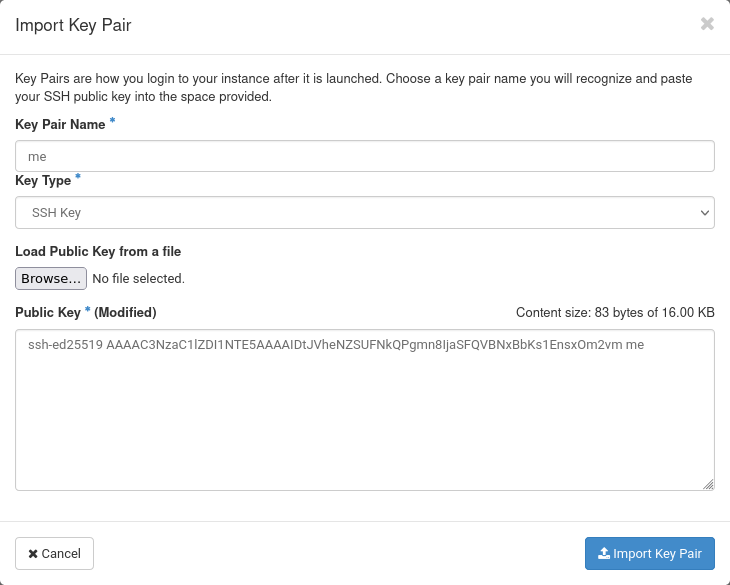
To import an existing SSH key click the Import Key Pair button and fill in the required
information. Be sure to select SSH Key as the key type.
Note
The key must be in the OpenSSL format to be accepted as valid key. This will require some more steps to be taken for users that want to import an SSH key that was generated in the PuTTY key format. For a guide on using PuTTY go here.
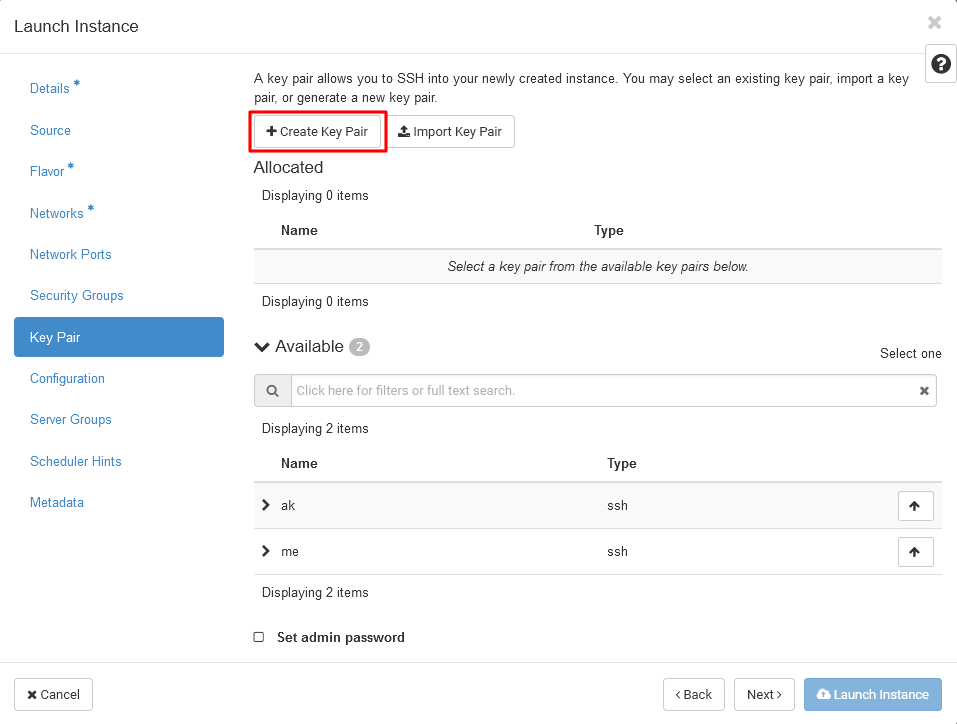
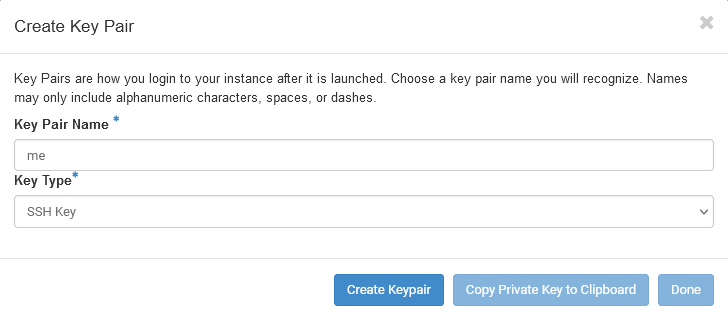
To create a new SSH key click the Create Key Pair button and fill in the required
information. Be sure to select SSH Key as the key type. Afterwards click Create Keypair.
Yo will be shown your private SSH Key. Be sure to store this key safely, as you will need
it to access your instance. A guide for using PuTTY with an OpenStack generated key can be
found here
Tip
In general create a file to store your private key and ensure only youe have access to it. For linux systems use the commands below to create a new file and modify access to it so only the owner can read and write to it.
Launching the Instance
Instance Access
Verify that you have added an SSH key to your instance, as otherwise you will not be able to access your instance after it has been launched. Therefore, be sure to add an SSH key. If you did not add an SSH key you will need to rescue your instance or re-create it. SSH password access is disabled by default!
Once finished, press Launch Instance to trigger creation of your virtual machine. This process might take some time. You can follow its progress by clicking on the instance name and viewing the log output provided by the guest operating system.
Completion is usually signaled by a log message like "Cloud-init finished" combined with an ASCII art overview of IP addresses and imported SSH keys.
Working with your instance
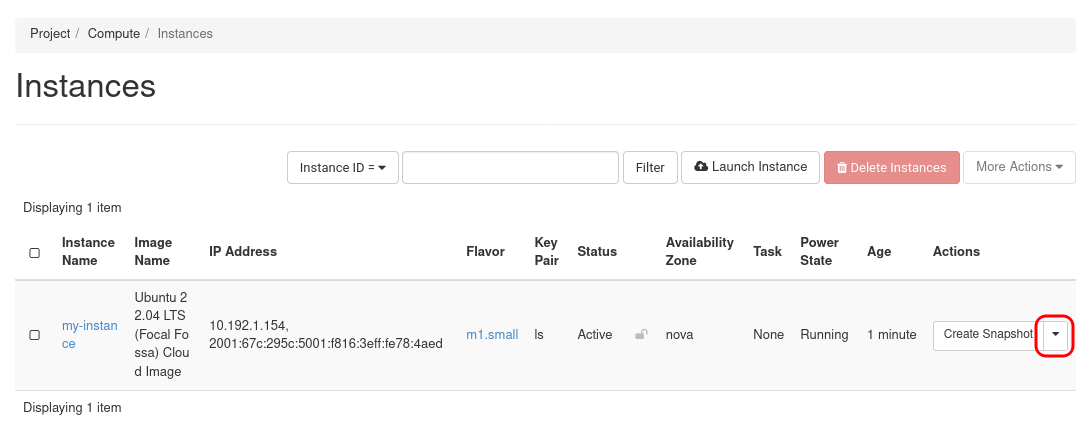
The first thing in working with your instance should be to verify your access to it. This should preferably be done via SSH. To access your instance use the IP address information found in the instance overview page. Here you can see that your instance has two IP addresses assigned to it:
- an IPv4 address from private RFC1918 space (e.g.
192.0.2.154) - a globally-routed IPv6 address (e.g.
2001:db8::f816:3eff:fe78:4aed)
Note
The IP addresses above have been altered to reside in the respective documentation prefixes. Your addresses will be in correct address-spaces.
Accessing an instance via SSH
The user to log in with via SSH depends on the base image you chose while creating the instance. Refer to the
table below. However, the table only refers to the images with Public visibility. Other images may use a different
user.
| Image | Username |
|---|---|
| CentOS Stream 9 | centos / cloud-user |
| Ubuntu 22.04 LTS | ubuntu |
| Debian 11 | debian |
| Fedora 37 | fedora |
Notice - Login Permission denied
If in doubt or one of the above users isn't working for you, you can also try and log in with the root
user. Most cloud images will present you a message like the following one showing you the user to use.
The IPv6 address is directly reachable from the outside world (if allowed by configured security groups).
- The username depends on the base image you selected when configuring your instance. For an cent-os image the user would be
centos
The private IPv4 address allows the VM to communicate outwards (through SNAT), but cannot be used to reach the system from the outside world. Therefor if you lack IPv6 connectivity it is required to associate a floating IP with your instance.
Public IPv4 access
A globally-routed IPv4 address may be allocated to your instance by using a concept called Floating IPs. Any traffic destined to a floating IP will be directed to the VM it is associated with.
In the instance overview, choose Associate Floating IP in the dropdown.
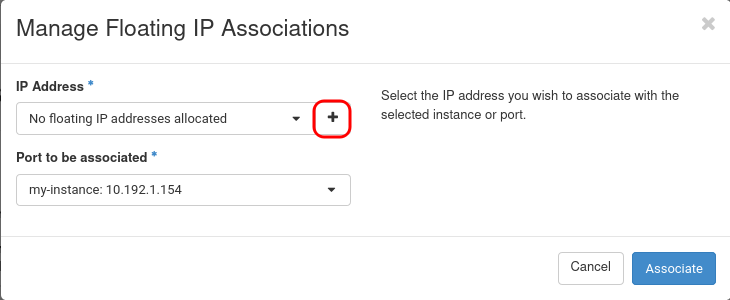
In the dialog you can either associate an existing floating IP or create a new one using the + button.
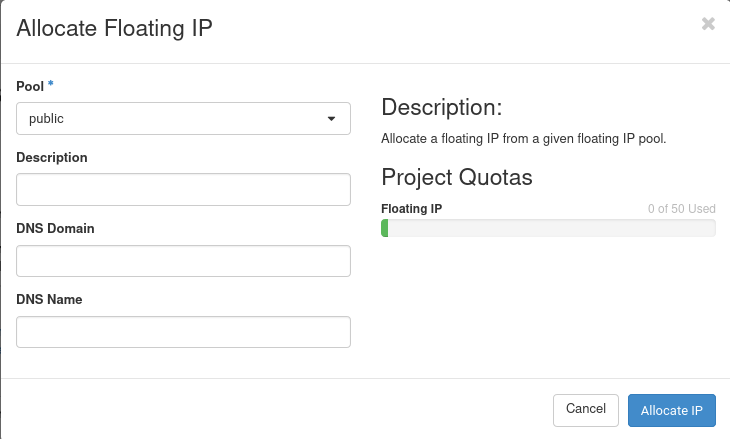
In the popup optionally add a description to your floating IP, but leave the DNS fields empty and click the Allocate IP button.
Associate the newly created floating IP with the instance.

Now your virtual machine should be reachable from the outside world using IPv6 as well as IPv4 (as allowed by security groups).
DNS names
Approximately no one wants to access services using their raw IP addresses. With IPv6 in particular, even remembering them is barely possible.
Hence, every project is also assigned a domain in the Domain Name System (DNS). Your domain (also called zone in DNS lingo) is available through the dashboard.
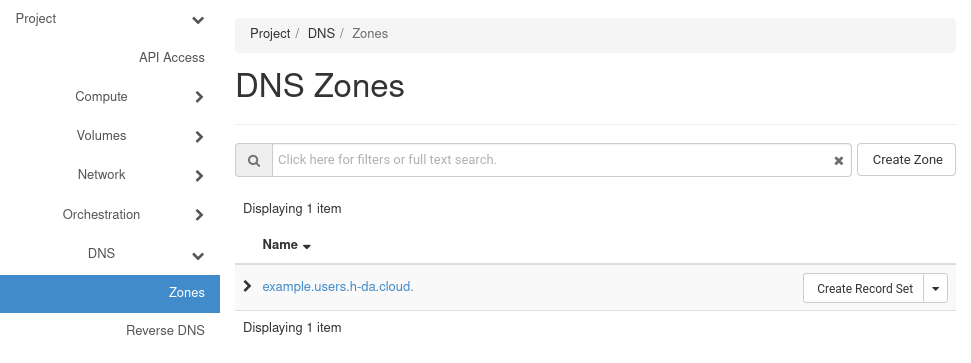
The DNS Overview shows your available DNS zones. By default a zone based on your project-short-id
followed by users.h-da.cloud is created. To create a DNS name for your instance click on the
Create Record Set button. Follow the steps on the next Tab and enter the required information.
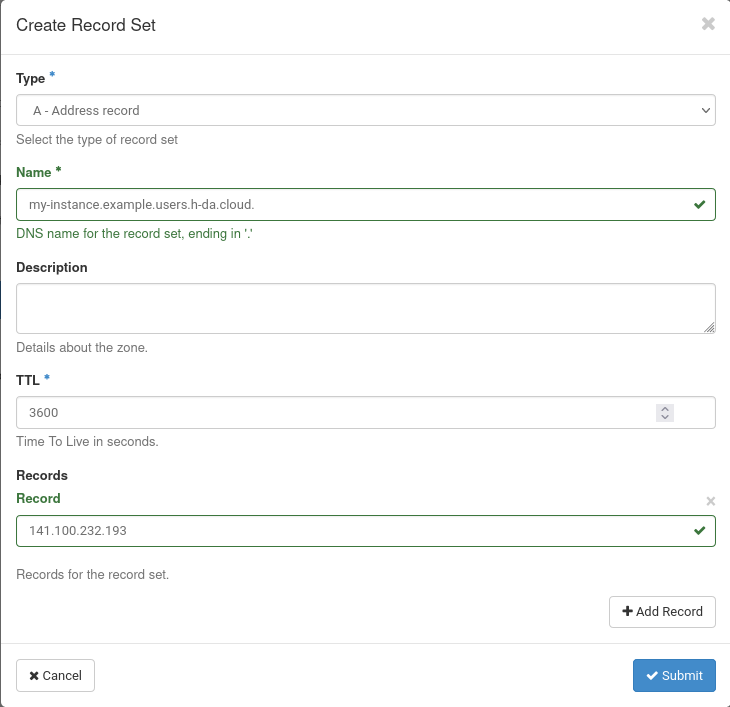
Enter the fully-qualified DNS name (dns-name.project-zone.)
to use (the name must be within your project domain) and the IP
address it should point to in the following dialog. Use the A record Type for IPv4 and AAAA
for IPv6 addresses. Submitting the changes will cause the Entry to become Pending before eventually
becoming active.
Info
In most cases project-zone should be the generated default zone project-short-id.users.h-da.cloud.
In this example my-instance is the dns name and example.users.h-da.cloud is the generated project zone.
Every Record Set will start out Pending before turning active. You can refresh the page to check
the record set's state.
Info
You need to navigate using the dashboard to refresh the page using the browser's refresh does not work here.

When the record set hast turned active you should now be able to connect to your instance using it's DNS name.
Tip
Don't be concerned if this doesn't work immediately. DNS data tends to be heavily cached and you might have to wait for a negative cache entry to expire (especially if you tried to use the name while it was not yet active on the OpenStack name servers).
Reverse DNS zones
In addition to the regular forward DNS zone that is created with your project, a reverse DNS zone for IPv6 addresses is also created. Let's go over the uses of this reverse zone and how to create records in it. In your zone overview you will see a zone that will look something like this:
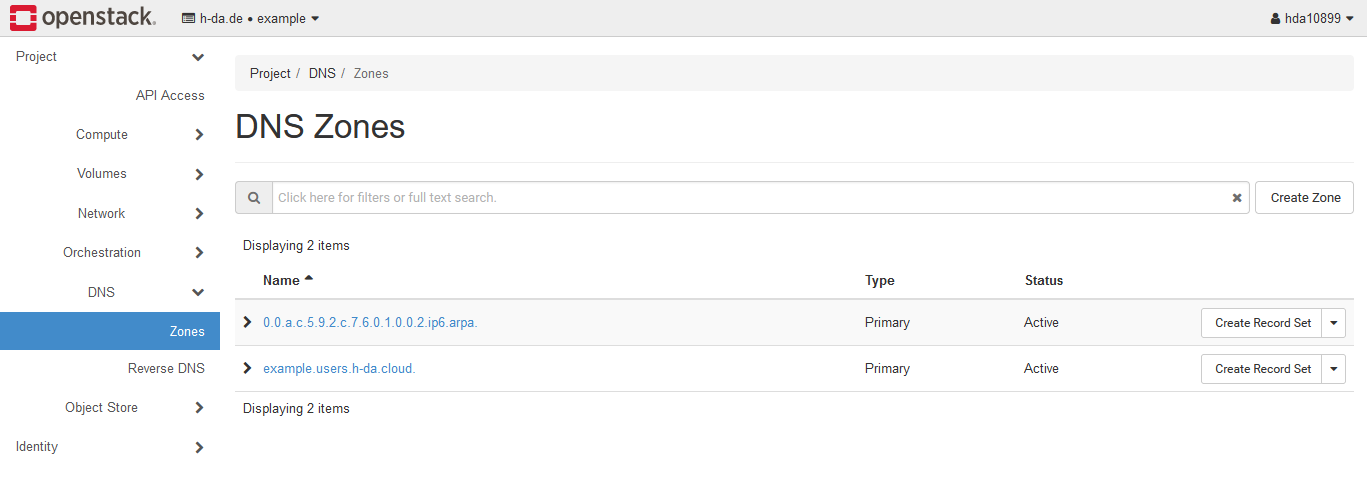
This basically is a reversed representation of your project's IPv6 network. But what is this actually used for? Usually you want to translate a hostname (i.e. myhost.mydomain.com) to it's IP address. This is called forward DNS. However, sometimes it is necessary to do the reverse, so to look up a hostname via an IP address.
To create a new IPv6 reverse record, enter the zone details and click the Create Record Set button
just like when creating a regular DNS record in the forward zone. In the dialog select PTR - Pointer Record
as the record type. For the Name of the record enter the reversed address. The record will be the hostname
that should be resolvable.
Note
To generate a reverse record of an IP address you can either use a website like whatsmydns
or a CLI tool like arpaname, as manually reversing an IP address, especially IPv6 can be really annoying.

Important
Contrary to forward records the trailing . for a reverse record is important, as otherwise the record
set cannot be created by OpenStack.
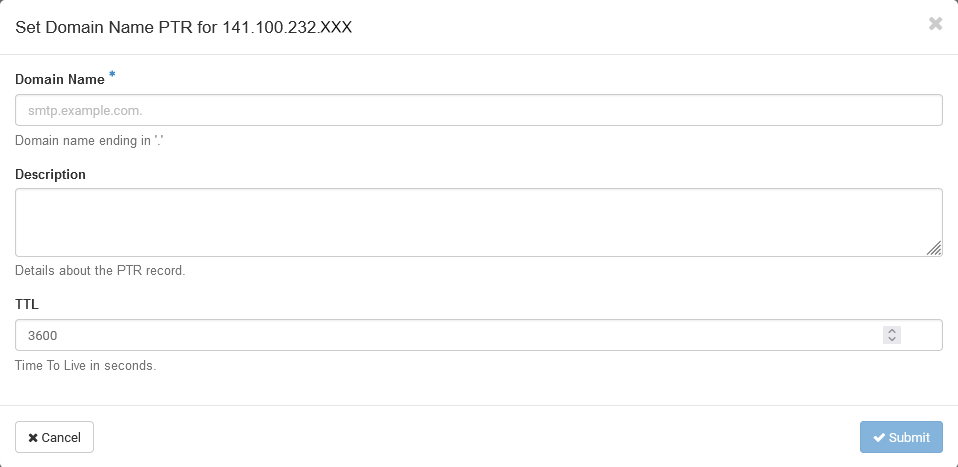
To create reverse records for IPv4 addresses there is no specific zone accessible to you. However,
reverse records can still be created for assigned Floating IPs. To create a new record select Reverse DNS
from the DNS category on the left.
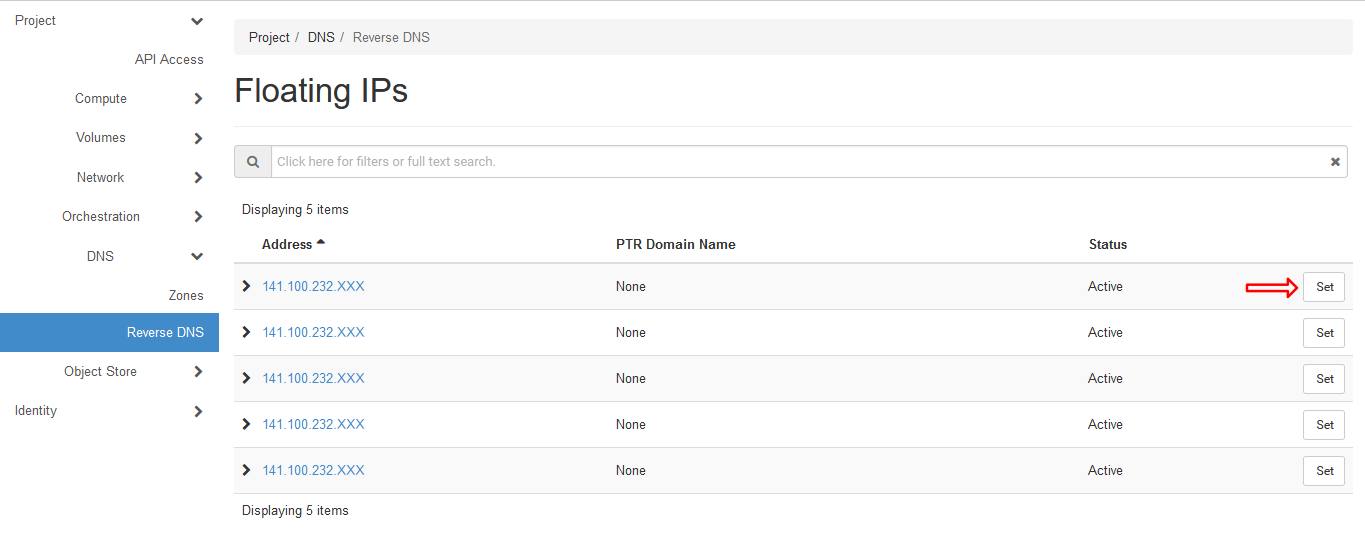
Here you will see a list of your assigned Floating IPs. To now set a reverse record click on the Set
button next to the respective FIP. In the dialog just enter the hostname that should be resolved by the
FIP.
Rescuing an instance
If you locked yourself out of your instance or lost the ability to access it due to a misconfigured network for example, OpenStack provides a way to rescue an instance and re-gain access.
To rescue an instance navigate to the instance overview and select Rescue Instance from the
Actions dropdown. You will be presented the following dialog.
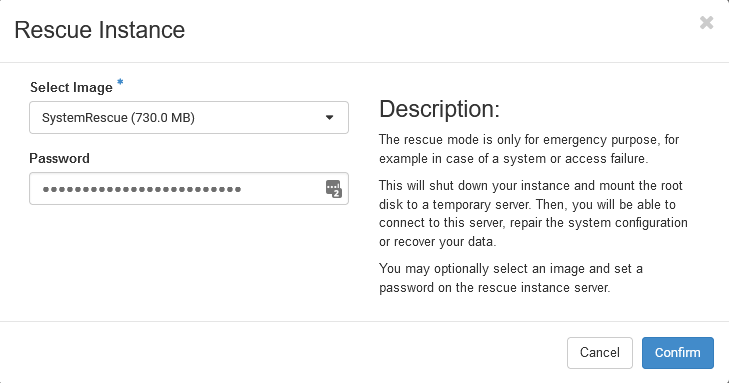
The SystemRescue image should be pre-selected, if it is not select it from the dropdown. You may
optionally set a password for the root user after the image boots. To boot the rescue image Confirm
an wait a bit for the instance to re-start.
Afterwards, access the instance's console by clicking the instance's name and open the
Console tab where you should see the following boot screen.
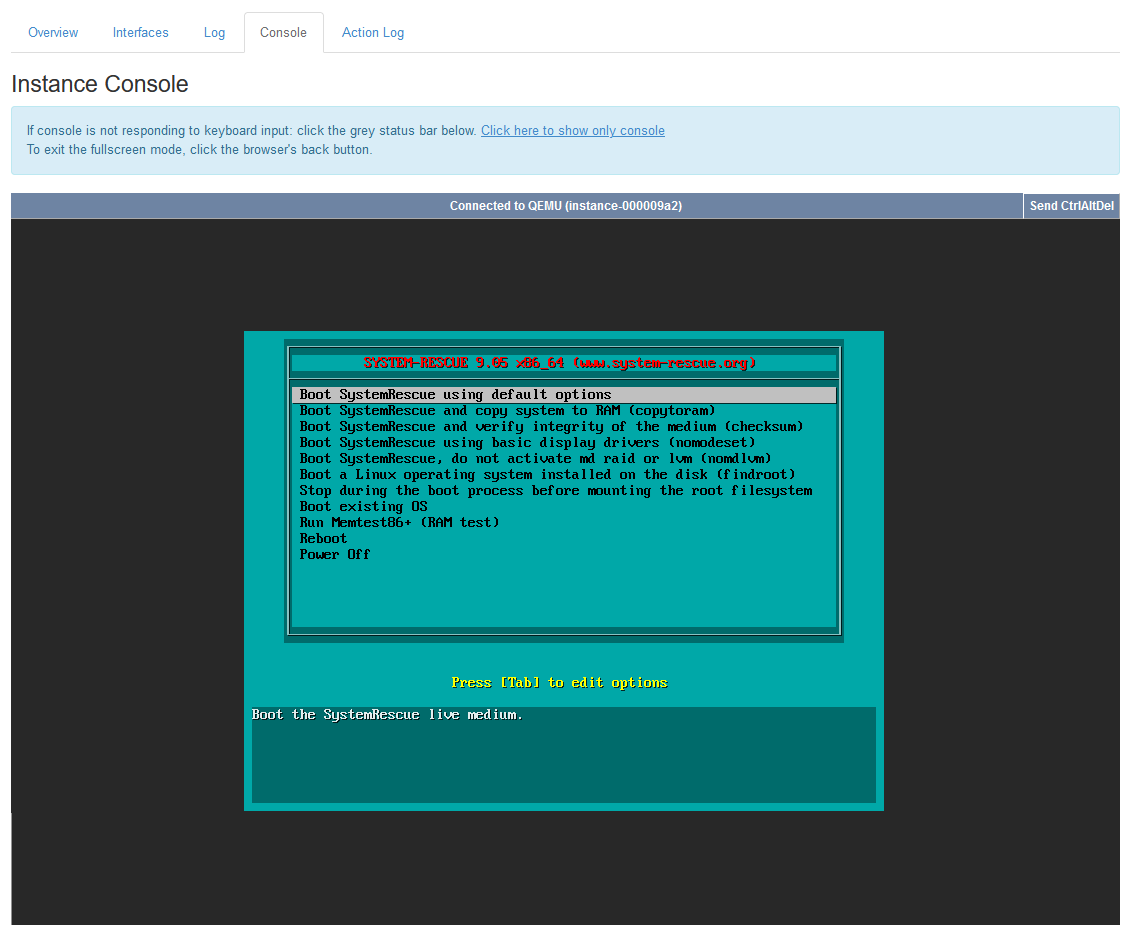
Here select the boot option that suits your needs and continue to mount your instance's filesystem.
to then perform actions on your instance use the chroot command with the mountpoint of your instance
as an argument. Having performed the actions required to re-gain access exit the chroot context and shutdown your instance.
Regarding SELinux
If your instance uses SELinux for example when using a CentOS base image be sure to place a
file called .autorelabel in your instances root directory, as otherwise SELinux labels are broken
which will lead to an inaccessible instance again.
To complete the system rescue select Unrescue Instance from the Actions dropdown and boot your
instance to put it back to normal operation.